
DIGITAL SMILE DESIGNING
The principles of smile design require an integration of esthetic concepts that harmonize facial esthetics with the dental facial composition and the dental composition.
DIGITAL SMILE DESIGN (DSD)- WAS INTRODUCED BY AMERICAN TECHNICIAN TURNED DENTIST DR. CHRISTIAN COACHMEN IN 2004
VITAL ELEMENTS OF SMILE DESIGNING
-The width of the face is typically the width of five ‘‘eyes’
-The four basic facial are the Square, Tapering, square tapering and ovoid.-A smile that is at least half the width of the face, at that level of the face, is considered
esthetic.
-An average lip line exposes the maxillary teeth and only the interdental papillae.
-Gingival Health, Symmetry, And Architecture Are Key Yet Often Overlooked In Smile Design
-An unfilled interdental space creates an unattractive black triangle in the gingival embrasure
-The gingival zenith is usually distal to the long axis on maxillary centrals and canines.
-For maxillary laterals and mandibular incisors, the zenith aligns with the tooth’s long axis.
DENTAL COMPONENTS
-An attractive smile line follows the lower lip curve, with centrals slightly longer than cuspids; a reverse smile line looks
aged.
-Central incisor height is ~1/16 facial height, W/H ratio 4:5, too long if lip interference
occurs, too short if below molar-cuspid line
VARIOUS GUIDELINES FOR ESTABLISHING CORRECT PROPORTIONS IN AN
ESTHETICALLY PLEASING SMILE ARE-
1. Golden proportion (lombardi),
2. Recurring esthetic dental proportions (ward),
3. M proportions (methot)
4. Chu’s esthetic gauges.
DIGITAL SMILE DESIGN-
Types of software for DSD-
1. KEY-NOTE SOFTWARE (IWORK)
2. PHOTOSHOP CS6 (ADOBE SYSTEMS INCORPORATED),
3. MICROSOFT POWERPOINT (MICROSOFT OFFICE, MICROSOFT, REDMOND, WASHINGTON, USA).
4. SMILE DESIGNER PRO (SDP) (TASTY TECH LTD),
5. AAESTHETIC DIGITAL SMILE DESIGN (ADSD - DR. VALERIO BINI),
6. CEREC SW 4.2 (SIRONA DENTAL SYSTEMS INC.),
7. PLANMECA ROMEXIS SMILE DESIGN (PRSD) (PLANMECA ROMEXIS®), VISAGISMILE (WEB MOTION LTD),
8. DSD APP BY COACHMAN (DSDAPP LLC),
9. GUIDED POSITIONING SYSTEM (GPS)
10. DSS (EGSOLUTION)
11. NEMODSD (3D)
12. EXOCAD DENTALCAD 2.3
Essential Photographic Views
• Photos needed: full-face at rest, full-face with wide smile, and retracted maxillary arch with teeth apart.
Recommended Video
• A short video capturing the patient’s concerns, expectations, and all smile and dental positions, including 45° and profile views.
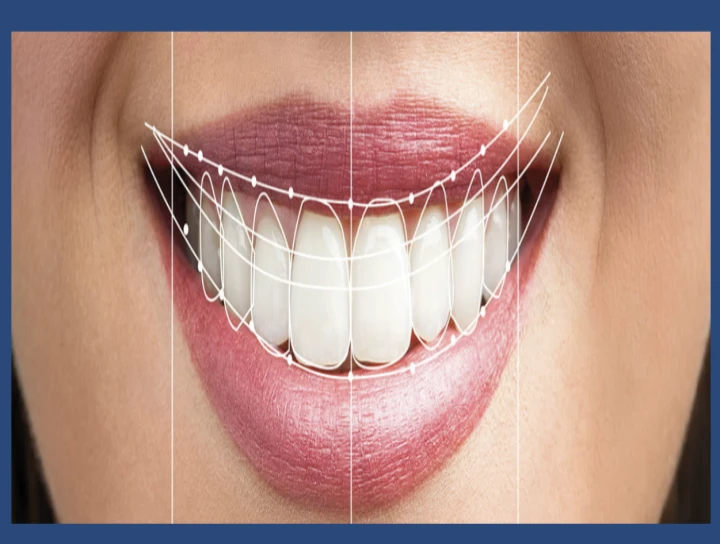
1. The Cross-
Two lines must be placed on the center of the slide, forming a cross.
The facial photograph with the teeth apart should be positioned behind these lines
2. Digital Facebow-
The interpupillary line sets the horizontal plane, then the facial midline is outlined using the glabella, nose, and chin
3. Smile Analysis-
Dragging the horizontal line over the mouth helps evaluate smile alignment and detect midline or occlusal plane canting.
4. Smile simulation-
Simulations can be performed to fix the incisal edge position, canting, shifting, tooth proportions, and soft tissue outline
5. Transferring the cross to the intraoral images-
Line 1: canine tip to contralateral canine tip
Line 2: central incisor edge to contralateral central edge
Line 3: dental midline from interdental papilla to incisal embrasure chin.
6. Measuring the tooth proportions-
Measuring the width/ length proportion of the central incisors is the first step
toward understanding how to best redesign the smile.
7. Tooth Outline-
Tooth outlines can be drawn over the photograph, or premade tooth outlines can be copied and pasted.
8. white and pink esthetic evaluation
9.Digital ruler calibiration
10.Transferring the cross to the cast
11. Test drive
12. Tooth preparation and fabrication of prosthesis
13.Cementation of Prosthesis
CONCLUSION-
The Digital Smile Design is a multi-use tool that can assist the restorative team throughout treatment, improving the dental team’s understanding of the esthetic issues and increasing patient acceptance of the final result.
Dr. Ruquaya Bashir
Reader
Department Of Prosthodontics Crown & Bridge
No Any Replies to “Digital Smile Designing”
Leave a Reply